NAF
Yuzu Emulator Guide & Tutorials:
How to Setup Yuzu Emulator On PC (Windows)
There are many people who know about Yuzu emulator for the first time and they try to install this emulator. When they install the emulator, they have to face some or the other error on their computer.
So guess don’t worry we have prepared this guide for you, In this we have told the complete process how you will be able to install Yuzu emulator on your PC without facing error.
Note: Keep in mind that your computer’s RAM must be minimum 8 Gb, even if it is 4 Gb, you will still be able to run the game. The game will run smooth on the emulator in 8Gb Ram.
First of all, we have to download the Yuzu emulator by visiting its official website. After the emulator is downloaded, you have to install the latest version of Microsoft Visual C++.
Install Yuzu Emulator on my PC
Here I assume you have downloaded and Extracted the Yuzu Emulator, Microsoft Visual C++, Prodkeys and Firmware needed.
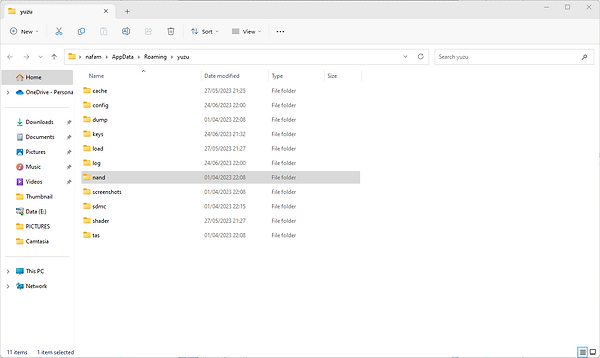
Step 1: Open the emulator and tap on the file on the top left corner “Open Yuzu Folder”

Step 2: After opening, a folder named “Keys” will be found. If not then create it.

Step 3: Open the unzipped folder and copy the “Prod.keys” and “Title.keys” files.

Step 4: Paste both the copied keys file into the Yuzu Keys folder.

Step 5: Open the unzipped folder and copy all of the Firmware file

Step 6: Paste the files into the Yuzu\nand\system\Contents\registered folder.


Step 7: Now open the Yuzu emulator and Configure Yuzu Emulator.
Tap on the Emulation option and click on Configure.


In configure you will find many things like General, System, GPU, Graphics, Audio and Controls.
Graphics Setting:

If your computer has a Nvidia graphics driver, then you have to select “OpenGL” here.
If your computer has AMD graphics driver, then you have to select “Vulkan” here.
Controls Setting:
In controls, we get the option to connect 6 types of controllers, this includes.

-
Pro Controller
-
Dual Joycons
-
Left Joycons
-
Right Joycons
-
Handheld
-
Gamecube Controller
Whatever controller you have in these, you can connect it with the emulator. If you want to do the movement of the game through keyword and mouse, then select both keyword/mouse in the input section.
If you have multiple controllers, you can select them here as well. You can also change the colors in the advanced option.
Step 8: After downloading the game, it has to be kept in a folder.
Open the emulator and tap on “Add new game directory”.

Step 9: Select the game located folder, tap on “Select Folder”.

Step 10: Now you can see that all the games have come on the emulator.

Step 11: Run any game by clicking on it, the game is already running.
Source : Yuzu Emulator Guide & Tutorials